Whipping a rope

Here I want to present three types of whippings that can be applied to a rope
to prevent it from unraveling. The first one is called a plain or common whipping and is actually
put on a rope as a temporary whipping (when there is not much time). It comes loose easily when
the rope is handeled. The second one is a so called palm and needle- or sailmakers whipping.
This type, when properly made, will never come off again, even when some of the turns are damaged.
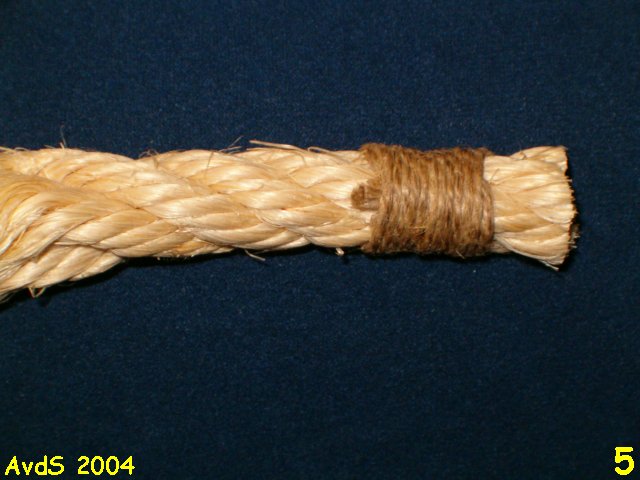
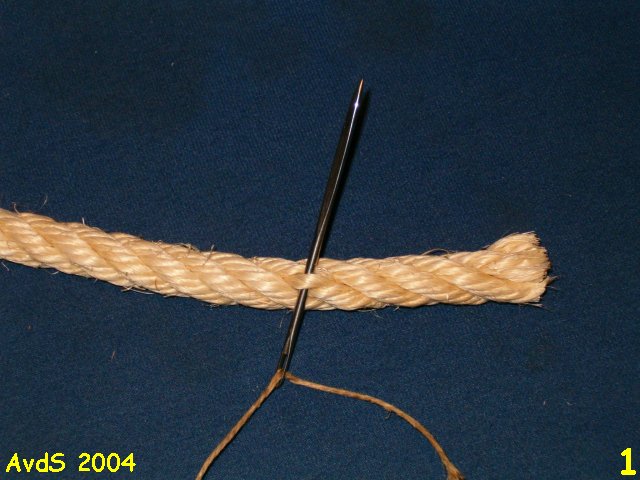
Common Whipping
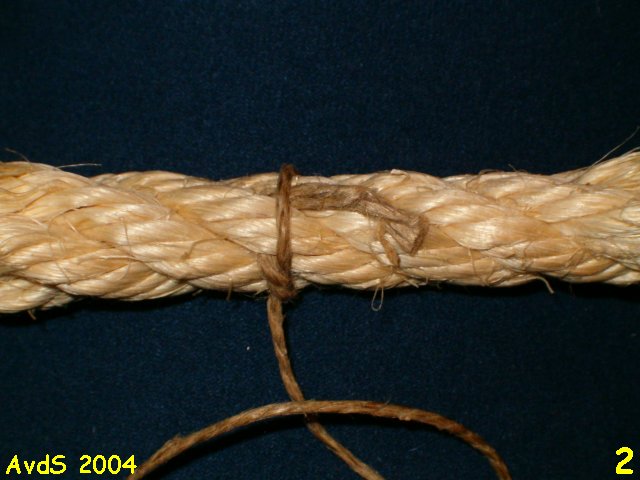
| Start of the common whipping |
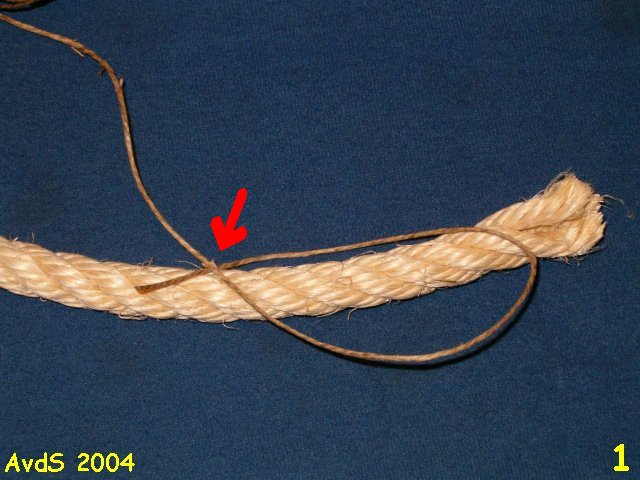 |
 Take a piece of twine, long enough to do the job, and lay it onto the rope as shown in picture 1. Keep
it in place (see red arrow) between your thumb and indexfinger.
Take a piece of twine, long enough to do the job, and lay it onto the rope as shown in picture 1. Keep
it in place (see red arrow) between your thumb and indexfinger. |
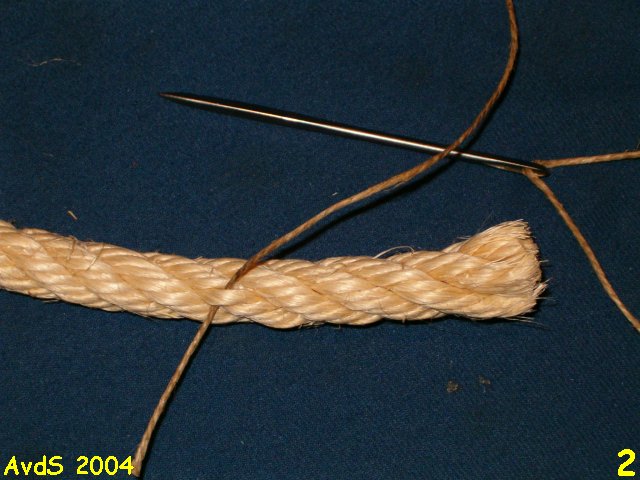
| Making the turns |
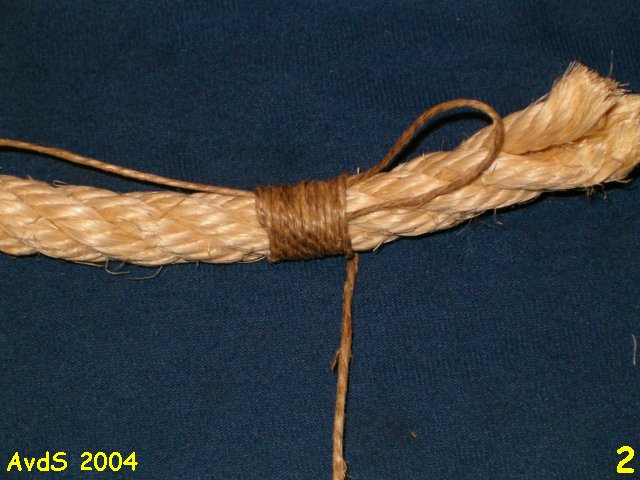 |
Now make a number of round turns. Make them close to eachother and as tight as possible.
The turns are made against the lay of the rope. Make sure that part of the loop stays free because you will
need this one later. The length of the whipping is roughly the same as the diameter of the rope. |
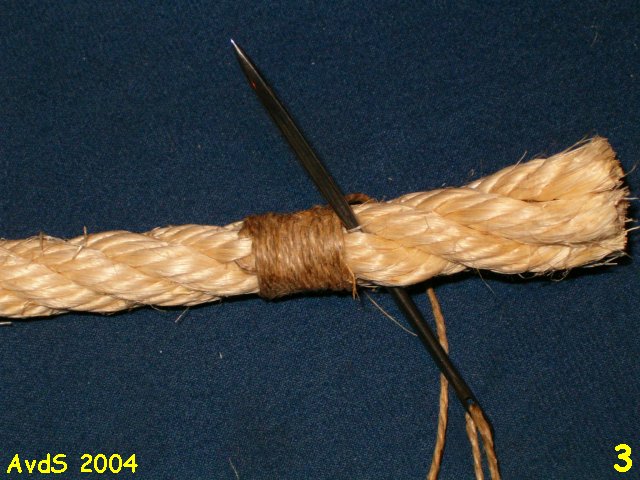
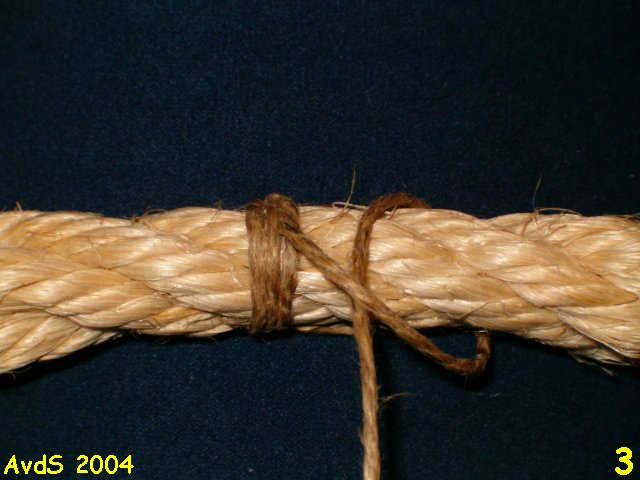
| Finishing the whipping (1) |
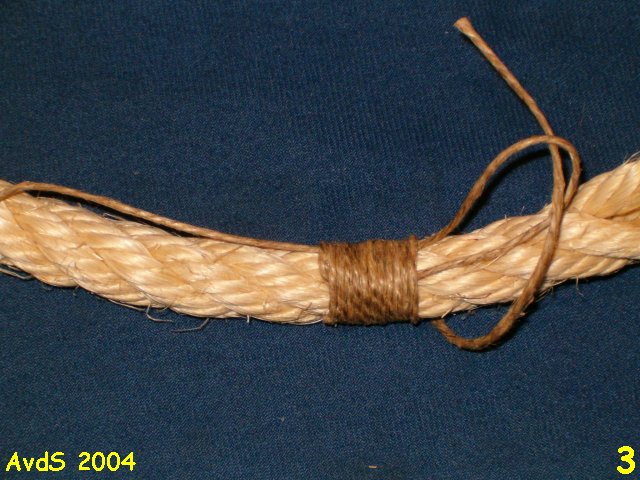 |
 Nu de takeling lang genoeg is kan met de afwerking worden begonnen. Als eerste wordt het werkende eind
door het lusje gestoken.
Nu de takeling lang genoeg is kan met de afwerking worden begonnen. Als eerste wordt het werkende eind
door het lusje gestoken.
Once the whipping is long enough you can start finishing it. First put the working end through the loop. |
| Finishing the whipping (2) / Afwerken van de takeling (2) |
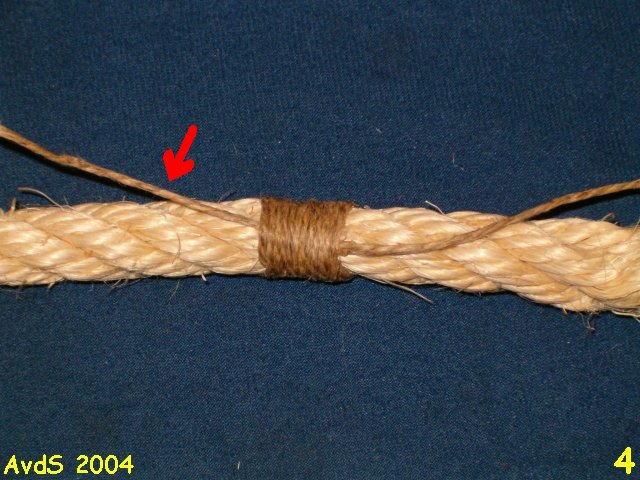 |
Trek nu aan het andere werkende eind zodat het lusje onder de rondtorns wordt getrokken.
Pull on the other working end and let the loop disappear underneath the round turns. |
| Finishing the whipping (3) / Afwerken van de takeling (3) |
 |
Als laatste worden de beide werkende eindjes kort afgesneden. Het touw zelf wordt
vlak bij de takeling ook afgesneden. Klaar!!
Trim off the working ends as close to the whipping as possible. Then cut the rope itself
close to the whipping. Ready!! |
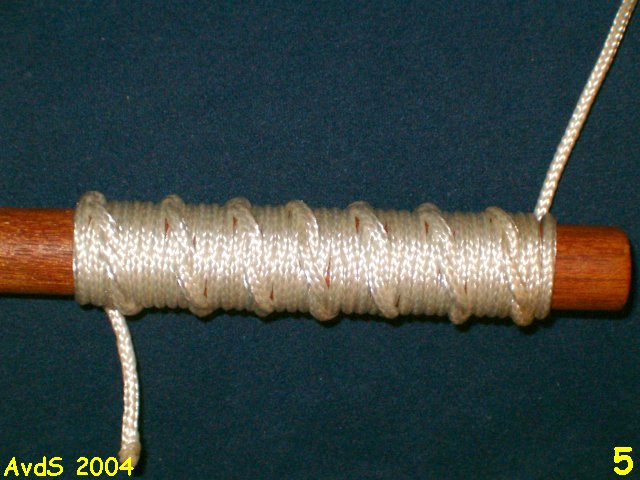
Sailmakers Whipping / Zeilmakers takeling
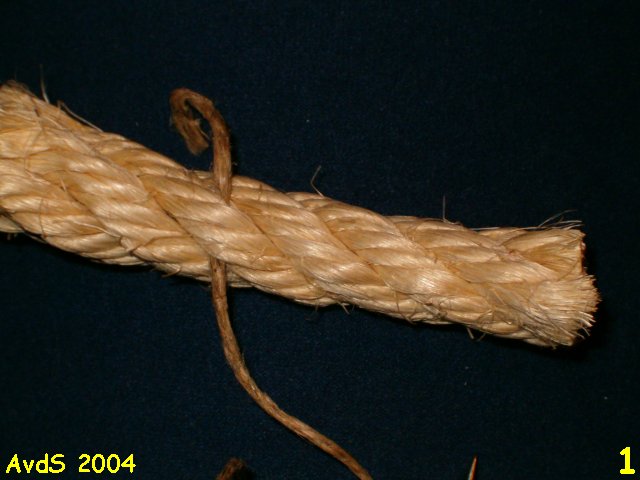
| Start of the sailmakers whipping (1) / Het begin van de zeilmakers takeling (1) |
 |
Neem een zeilmakers naald en een stuk dunne lijn en steek dwars door een streng van het touw.
Take a sailmakers needle and a piece of twine and reeve it through one of the rope's strands. |
| Start of the sailmakers whipping (2) / Het begin van de zeilmakers takeling (2) |
 |
Trek de lijn door de streng en zorg ervoor dat er een klein stukje uit blijft steken.
Dit stukje verdwijnt onder de rondtorns.
Reeve the line through the strand and make sure that a small length will remain. This will
disappear under the turns you are about to make. |
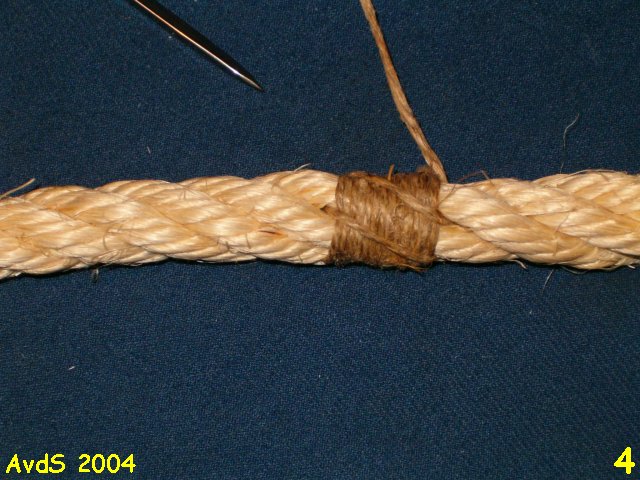
| Making the round turns / Het maken van de rondtorns |
 |
Maak nu een aantal rondtorns tegen de slag van het touw in totdat de lengte van de
takeling ongeveer gelijk is aan de diameter van het touw. Steek dan de naald door één van de
strengen heen zodat hij uitkomt in de tier tussen twee strengen. Trek het geheel strak aan.
Make a number of round turns, against the lay of the rope, until the length of the whipping is about
the diameter of the rope. Now pass the needle through a strand. The needle should emerge in the
contline between two strands. Draw up snugly. |
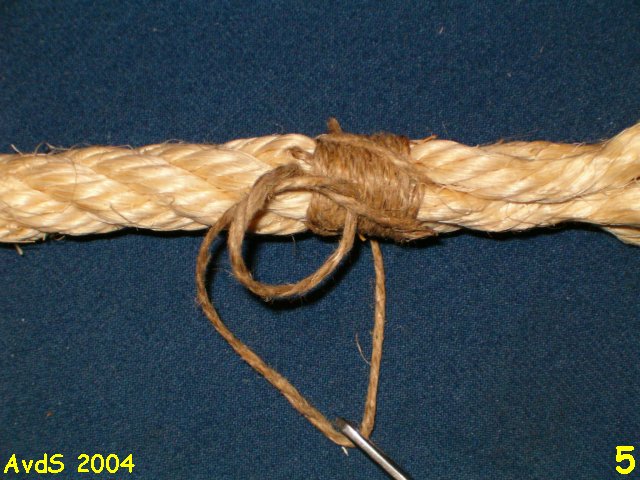
| Securing the whipping/ Vastzetten van de takeling |
 |
Ga met de dunne lijn over de takeling heen en steek de naald vervolgens weer door een streng heen.
Het takelgaren komt in de tieren van het touw te liggen. Trek na elke doorsteek strak aan.
Blijf dit proces herhalen totdat je alle strengen hebt gehad.
With the twine, go over the whipping and make a stitch through a strand again. The twine will lay in between
two strands. Keep on repeating this process until you have done all the strands. |
| Finishing the whipping / Afwerken van de takeling |
 |
Om de takeling af te werken wordt het takelgaren door het touw gestoken en eventueel met een halve steek vastgezet.
To finish the whipping stick the needle through the rope and secure with a half hitch or simply cut off the twine. |
| Finished whipping / Afgewerkte takeling |
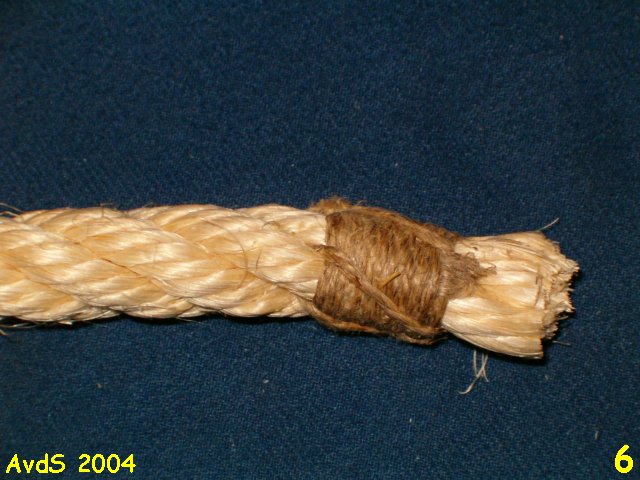 |
Als laatste wordt het touw zelf dicht bij de takeling afgesneden.
As a last step the rope itself is being cut close to the whipping. |
French Whipping / Takeling van halve steken
| Start of the French whipping / Het begin van de takeling |
 |
Neem een lang genoeg stuk dun touw en steek dit met een zeilnaald door één van de strengen
van het touw zoals in foto 1 is te zien. .
Take a piece of twine, long enough to do the job, and with a sailneedle, reeve it through one of the
strands of the rope as shown in picture 1. |
| Making the first half hitch / Het maken van de eerste halve steek |
 |
Leg nu het korte staande eind over het touw naar rechts en maak vervolgens een halve steek met het
werkende eind. deze takeling wordt gemaakt met de slag van het touw mee.
Now lay the short standing part to the right and make a half hitch with the working end. This whipping is made with
the lay of the rope.
|
| Continueing the half hitches / Doorgaan met maken van halve steken |
 |
Ga nu door met het maken van halve steken totdat de takeling lang genoeg is. Zorg ervoor dat het staande
eind netjes onder de steken verdwijnt en dat de steken netjes aaneengesloten komen te liggen. Als alles goed
gaat zie je een spiraal om het touw heen ontstaan.
Keep on taking half hitches around the rope until your whipping has reached a sufficient length. Make also sure that the
standing part is burried under the hitches and that the hitches are all close together (no gaps). If you do
it right you will see a spiral arising around the rope. |
| Finished whipping / Takeling gereed |
 |
Op foto 4 zie je hoe de takeling eruit behoort te zien. Je kunt met deze techniek ook prima allerlei
ronde voorwerpen bekleden. Hoe dat eruit ziet kun je in de volgende en tevens laatste foto zien.
In photograph No. 4 you see how the whipping should look like. It is also possible to cover all kinds of
round objects with this technique. Take a look at the last picture to see how this is looking |
| Covered stick / Beklede stok |
 |

